In this article I want to show you how you can create a powerful text validation in UIKit with Combine. We’re going to start with the nonsense view model you see in most validation with Combine tutorials and turn it to something amazing.
1.1 Creating the view model
To show you why the approach most tutorials take on this subject is a bad approach – I think we should actually program out their solution. Then I’ll explain to you to the limitations I met with their solution in the Messenger Clone application and then we turn the bad code into something amazing.
1.2 CustomTextField
Before we start, we’re going to use the CustomTextField from the previous article to perform our validation. If you didn’t read that one, it’s just a custom class for a text field that can create different instances of itself (name, email, password). So I’m going to use the completed repository from the last article, as a starting point for this one.
2 NameViewModel
Now, let’s go back to the view model I promised to create. So, say that we wanted to validate that the user typed in a valid name in our custom text field.
1
2
3
finalclassNameViewModel{}
Since we have a NameViewModel, lets rename the TestViewController to a NameViewController and pretend that it is our screen for a name validation.
1
2
3
classNameViewController:UIViewController{// ...}
The NameViewModel will now have one publisher for the text that will be bound to the text field and another publisher that will represent the state of our text field.
 1
 2
 3
 4
 5
 6
 7
 8
 9
10
11
12
finalclassNameViewModel{// first we declare a state representing the validation of our nameTextFieldenumNameState{caseidlecaseerrorcasesuccess}@PublishedvarfirstName=""// we will bind the text of our textField to this publisher@Publishedvarstate:NameState=.idle// we will subscribe to this state for updates on our textField}
I think just leaving the error case in the enum without a feedback is foolish, so let’s upgrade it:
enumNameState:Equatable{caseidlecaseerror(ErrorState)casesuccessenumErrorState{caseemptycasetoShortcasenumberscasespecialCharsvardescription:String{switchself{case.empty:return"Field is empty."case.toShort:return"Name is to short"case.numbers:return"Name can't contain numbers."case.specialChars:return"Name can't contain special characters."}}}}
Now we need to translate the text input into the state of our validation. We can do that by creating new publishers that uses our name publisher as a starting point, then they will perform some validation on the output and end the publisher with a boolean indicating whether or not the filter was successful.
varisEmtpy:AnyPublisher<Bool,Never>{$firstName.map{$0.isEmpty}.eraseToAnyPublisher()// this will "erase" the type or hide it// so it can capture what's actually important// which is the boolean// and return it wrapped in an AnyPublisher}varisToShort:AnyPublisher<Bool,Never>{$firstName.map{!($0.count>=2)}.eraseToAnyPublisher()}varhasNumbers:AnyPublisher<Bool,Never>{$firstName.map{$0.hasNumbers()}.eraseToAnyPublisher()}varhasSpecialChars:AnyPublisher<Bool,Never>{$firstName.map{$0.hasSpecialCharacters()}.eraseToAnyPublisher()}// Observe how we are telling our code what we desire it to do,// rather than the exact steps it should take to get there.
Now the code won’t compile because hasNumbers and hasSpecialChars uses string methods that doesn’t exist, so let’s create them:
// String + ExtensionsextensionString{funchasNumbers()->Bool{returnstringFulfillsRegex(regex:".*[0-9].*")// .* means "any character, any number of repetitions."// We need it to match the whole string, otherwise it will just return false,// ...even though it should return true}funchasSpecialCharacters()->Bool{returnstringFulfillsRegex(regex:".*[^A-Za-z0-9].*")// ^ means not}privatefuncstringFulfillsRegex(regex:String)->Bool{lettextTest=NSPredicate(format:"SELF MATCHES %@",regex)guardtextTest.evaluate(with:self)else{returnfalse}returntrue}}
To combine all the states and translate them into the current state, let’s create a new publisher that will start the validation.
What is nice about this approach is that we’re receiving the current state of all our validations concurrently – and we can use the tuple output that we get in return from them to create a error hierarchy.
Now you may ask, why a function? Often, we don’t want to give error feedback to the user before a button is tapped. So, a method that we can trigger when it fits us is more suitable.
All we have to do now is bind the text field to the name publisher property in our code. So, let’s extend the functionality of the text field so it can return us a publisher with the current text input:
 1
 2
 3
 4
 5
 6
 7
 8
 9
10
11
12
// UITextField + ExtensionsextensionUITextField{// now lets create a publisher based on the notification that we observe...functextPublisher()->AnyPublisher<String,Never>{NotificationCenter.default.publisher(for:UITextField.textDidChangeNotification,object:self)// ...which is the textDidChangeNotification.compactMap{($0.objectas?UITextField)?.text}// we have our object with the text property.eraseToAnyPublisher()}}
And bind the text field to the firstName publisher in our instance of the NameViewModel:
Nice! But our code still won’t compile because we haven’t implemented the errorLabel – and we don’t have a container that can show and hide our errorLabel. So let’s implement the errorLabel first:
So how do you show and hide views in UIKit? The best way is by using a UIStackView. Why? A UIStackView is much more flexible because of its automatic constraints when you hide and show views.
So, let’s create a expanding vertical stack that will hold all our components and show/hide the errorLabel.
Now we should reconfigure our setup method by adding the old UI of the text input (textFieldBackgroundView with textField) and the errorLabel into the expandingVstack.
privatefuncsetup(){textField.placeholder=viewModel.placeholdertextField.isSecureTextEntry=viewModel.isSecuretextField.keyboardType=viewModel.keyboardTypetextField.autocapitalizationType=viewModel.autoCaptextFieldBackgroundView.addSubview(textField)addSubview(expandingVstack)expandingVstack.addArrangedSubview(textFieldBackgroundView)// old text input UIexpandingVstack.addArrangedSubview(errorLabel)// is hiddentextFieldBackgroundView.widthAnchor.constraint(equalTo:widthAnchor).isActive=true// isn't required, but I like to keep ittextFieldBackgroundView.topAnchor.constraint(equalTo:textField.topAnchor,constant:-9).isActive=truetextFieldBackgroundView.bottomAnchor.constraint(equalTo:textField.bottomAnchor,constant:9).isActive=truetextField.leftAnchor.constraint(equalTo:textFieldBackgroundView.leftAnchor,constant:6).isActive=truetextField.rightAnchor.constraint(equalTo:textFieldBackgroundView.rightAnchor,constant:-6).isActive=trueerrorLabel.widthAnchor.constraint(equalTo:widthAnchor).isActive=truetranslatesAutoresizingMaskIntoConstraints=false// and the height ...}
2.3 Updating the height of the CustomTextField
Now our expandingVstack will act as the container for all the subviews in our CustomTextField class, which means that it should determine the height. Why? When it shows the validation label it will automatically update its constraints and grow in height. So let’s change the heightAnchor at the bottom of the setup code:
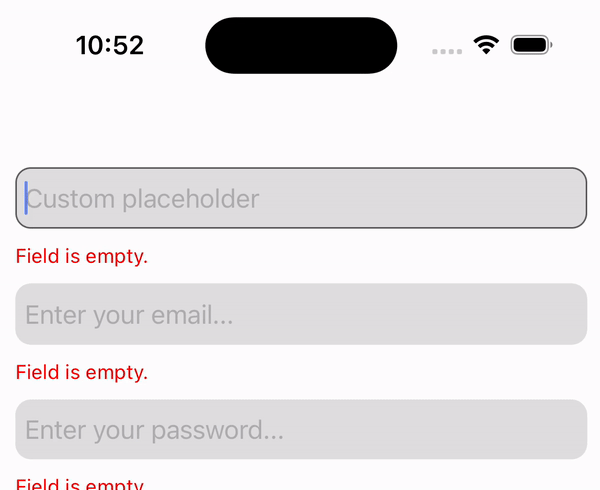
Nice. Now run the code and see the errorLabel conditionally return us an error when the name input is invalid.
3 So why is this a bad approach?
3.1 Duplication
The first problem I faced by using a view model is that I had to duplicate the validation process for each screen. Why? Each validation was now in the scope of a single view model, and that view model was tightly coupled with the view controller for that screen – NameViewModel with NameViewController, EmailViewModel with EmailViewController etc.
3.2 Forcing a view model
The second problem was that the view model felt more forced, what do I mean by that:
In production code I found the validation code in the class for the custom text fields. Which makes a lot more sense. Why? If it’s outside our text field we have to implement it every single time we use the text field.
The screens were fairly simple, and I didn’t need another reference type for the validation of the text input. So I thought there must be a better way. And there is!
4 Start with a protocol
Whenever you’re developing classes for behavioral purposes, and you’ve created some behavior that’s hard to replicate, think protocols. What do I mean by behavioral purposes – think of what we are actually trying to achieve with our NameViewModel class. We’re not trying to create a layer between us and a specific service class where we can transform the models into actual data for our view. No, we have only built a validation behavior. The same applies if we created a class for drawing behavior. We will again restrict ourselves to the scope of our class and the limitations of classes.
4.1 Protocol-oriented programming
In WWDC 2015 apple introduced Protocol-oriented programming, with the purpose of tackling problems like these. If you haven’t seen that talk, I highly recommend that you do. I don’t see this approach too often in applications, but when it works it’s absolutely beautiful.
4.2 Validatable
Like Apple says, don’t start with a class, start with a protocol. So, let’s define a blueprint of the expected behavioral for all validations. We want them to execute a function on a text publisher and use filters to return a state we can deal with. Since we’re refactoring the NameViewModel, you can think of it as an abstraction of the behavior of our startValidation function.
Xcode will now yell at you, since we haven’t defined the validation state. Let’s transform the enum we had for the state of our text field into one that fits all our text field cases.
enumValidationState:Equatable{caseidlecaseerror(ErrorState)casevalidenumErrorState:Equatable{caseemptycaseinvalidEmailcasetoShortPasswordcasepasswordNeedsNumcasepasswordNeedsLetterscasenameCantContainNumberscasenameCantContainSpecialCharscasetoShortNamecasecustom(String)// if default descriptions doesn't fitvardescription:String{switchself{case.empty:return"Field is empty."case.invalidEmail:return"Invalid email."case.toShortPassword:return"Your password is to short."case.passwordNeedsNum:return"Your password doesn't contain any numbers."case.passwordNeedsLetters:return"Your password doesn't contain any letters."case.nameCantContainNumbers:return"Name can't contain numbers."casenameCantContainSpecialChars:return"Name can't contain special characters."case.toShortName:return"Your name can't be less than two characters."case.custom(lettext):returntext}}}}
Nice. But whatever that implements this protocol needs help, because in the startValidation function we get help from our filters to determine the state. We can add default implementations to our protocol by extending it.
extensionValidatable{// this is exactly the same as we had earlier,// but now we aren't restricted to $firstName publisher.funcisEmtpy(publisher:AnyPublisher<String,Never>)->AnyPublisher<Bool,Never>{publisher.map{$0.isEmpty}.eraseToAnyPublisher()}// remember to upgrade this onefuncisToShort(publisher:AnyPublisher<String,Never>,count:Int)->AnyPublisher<Bool,Never>{publisher.map{!($0.count>=count)}.eraseToAnyPublisher()}funchasNumbers(publisher:AnyPublisher<String,Never>)->AnyPublisher<Bool,Never>{publisher.map{$0.hasNumbers()}.eraseToAnyPublisher()}funchasSpecialChars(publisher:AnyPublisher<String,Never>)->AnyPublisher<Bool,Never>{publisher.map{$0.hasSpecialCharacters()}.eraseToAnyPublisher()}}
If you think about it, what we really want are value types, not reference types; we want to make plain copies of the validation behavior and then customize it.
Now we can use this struct for the name validation and we can get rid of the bloated NameViewModel. But I promised that it can be dynamic and that we can replicate the behavior. So let’s create a EmailValidation and PasswordValidation the same way.
To make use of our validations, let’s create a protocol, so that if a class conforms to the protocol, it now has the capability to use the methods of our custom Validatable objects.
To finish our publisher, we can create a default implementation of the validateText function so we don’t have to implement it each time we conform to the Validator protocol.
// MARK: - ValidatorextensionNameViewController:Validator{privatefuncstartValidation(){validateText(validationType:.name,publisher:nameTextField.textField.textPublisher()).sink{[weakself]stateinself?.nameTextField.validationStateChanged(state:state)}.store(in:&subscriptions)// If text is empty.// Won't get notified until the text actually changes, so we toggle the method manually to// ...notify our publisher.NotificationCenter.default.post(name:UITextField.textDidChangeNotification,object:nameTextField.textField)}}
Awesome! We now have the same validation behavior, but we can choose from multiple validations, and we have removed the unnecessary NameViewModel class. However I’m still not satisfied with our solution. Because now, we have to implement the validation every time we use the CustomTextField.
So, let me show you two amazing things that we can do to make our code beautiful.
5 RawValue
First, move the conformance to the Validator protocol into the CustomTextField class instead. Why? As I mentioned earlier, we don’t want to implement validation behavior every time we use a CustomTextField.
And remove all the validation code in viewDidLoad.
Now since we know that the enum CustomTextFieldType has the same cases as our ValidationType enum, and it is big chance that it stays that way, we can actually transform one enum into the other. Then you might ask: “Why can’t we use one for both?”. Even though we duplicate the naming cases, I still think we have better code with two enums – since one should belong to the CustomTextField class and one should be for the ValidationType. If we didn’t use two enums the naming would be CustomTextFieldValidationType, which doesn’t make sense. So let me show you how we we can do with the rawValue.
Now, all of our text fields chooses their validations dynamically without we having to lift a finger. But before we jump to the final magic, we need to make some changes. We don’t have a way of telling the parent class that the validation state of our text field has changed. So, let’s move the validation state we had in the NameViewModel into our text field.
And assign our validation publisher to it. We change the .sink subscriber to a .assign subscriber, and we should perform a check to ensure that the state of the validation is .idle (we don’t want to start the validation multiple times on the same text field).
Now everything is nearly perfect, but we don’t have any control on the pipeline of our text publisher. The validation should wait 0.2 seconds so it doesn’t send different validation states while the user is typing, and remove the duplicates if the user types really fast back and forth. You could solve this by creating a computed property in our text field class:
If you think about it what a validation should be is a combine operator. Why? We already have a text publisher, so why not perform the validation on the text publisher with a validation operator.
Copy the part where we handle the pipeline in the customTextPublisher and delete the property. Move it into the startValidation function and replace the validateText call.